Introduction
-In the following tutorial, I am going to take you through my process
of developing and executing a tattoo. All aspects of sterilization and
cross contamination should be covered before beginning a tattoo. This
is in no way a replacement for an apprenticeship, or an instructional
on how to learn to tattoo; this is simply my way of tattooing. I will
be walking you through every step of my creative thought processes. In
this tutorial, I will be elaborating on how I execute the following
steps.
-Reference
-Drawing and Design
-Creating a Stencil
-Tattooing Style
-Procedure Set-up
-Tattoo Procedure
-Aftercare
Reference
-The piece I will be doing is a female zombie. I usually like to keep
my tattooing really fun and relaxed. I always try to draw everything
that I tattoo, even if it is created from a reference. I believe that
it keeps my drawing skills sharp, and continuously allows me to
improve. This particular reference is a photograph that I took of my
wife. I took various photos with different types of lighting. I
really wanted to have dramatic lighting on this piece, so we used
different elements, such as, a flashlight in a dimmed room to achieve
my desired effect. When you get a good picture, with excellent
lighting, there is not much that needs to be manipulated by Photoshop.
However, I took this picture and put it in Photoshop, and it flipped
horizontally “Flip Canvas”
I then used the “Apply Image” tool at a thirty-percent ratio, which gives an overall sharper contrast. Funny enough, I learned this helpful tool from Brandon Bond.
I finish it off with the “Burn Tool,” which helps create a higher contrast
on selected areas. The reference is now ready to be used to create the
design.
Drawing and Design
-As mentioned earlier, I like to draw as much as possible for my
tattoos, even when I have reference available. Unless I am doing a
portrait, I like to loosely use the picture to create a drawing of my
own. This is very helpful in creating accurate proportions and light
sources. In this reference in particular, I am solely using the pose,
proportions and light source, rather than creating a reproduction of
the photo. Especially since the reference photo is my wife, I would
not tattoo a portrait of her on anybody, and would prefer nobody else
do so. This makes the process a lot of fun for me. I am able to take a
photo, and create something completely different from it, while still
keeping the foundation of the reference.
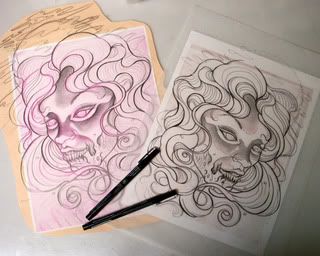
-I like to start off with a color pencil sketch which allows me to
change shapes and add elements. I prefer color pencil over lead
because I am still able to see the colored lines, and with lead, it
tends to smear easier and becomes more difficult to see. When you have
a colored pencil sketch, you can make a photocopy in color and then
you can go over it with a dark pencil to clean the design up.
Drawing and Design
-As mentioned earlier, I like to draw as much as possible for my
tattoos, even when I have reference available. Unless I am doing a
portrait, I like to loosely use the picture to create a drawing of my
own. This is very helpful in creating accurate proportions and light
sources. In this reference in particular, I am solely using the pose,
proportions and light source, rather than creating a reproduction of
the photo. Especially since the reference photo is my wife, I would
not tattoo a portrait of her on anybody, and would prefer nobody else
do so. This makes the process a lot of fun for me. I am able to take a
photo, and create something completely different from it, while still
keeping the foundation of the reference.
-I like to start off with a color pencil sketch which allows me to
change shapes and add elements. I prefer color pencil over lead
because I am still able to see the colored lines, and with lead, it
tends to smear easier and becomes more difficult to see. When you have
a colored pencil sketch, you can make a photocopy in color and then
you can go over it with a dark pencil to clean the design up.
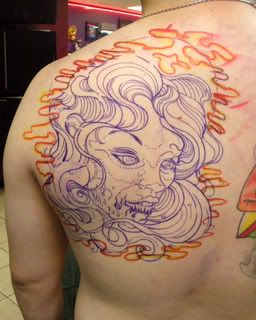
Creating a Stencil
-When making a stencil, there are a few different things that I may
do. If I am working on a portrait, I make a copy of the photo and
trace the copy on top of the thermal fax paper. This helps me achieve
accuracy in a portrait, without having a barrier, such as tracing
paper, in between the photo and myself. When doing something more
stylized, such as this tattoo, I simply trace my line drawing while
keeping it loose. I let the shading and coloring happen once I being
to work directly on the skin. Another possibility is free-handing a
design directly on the skin. I use different colored sharpies,
starting with a light sharpie, to map out the overall area to be
worked on. I then use a medium colored sharpie to create a sketch, and
finally, finish with a dark sharpie to refine details before beginning
to tattoo.
Tattooing Style
-Now that the stencil, or drawing, is applied to the skin, you can go
in a number of directions. In my time tattooing, I have experimented
with, and applied various elements that have created my personal
style, which is constantly evolving. Some of the styles I have enjoyed
doing most are realism, neo-traditional, and illustrative. I have
taken all of these styles and fused them into one undefined style;
currently, this is what I enjoy doing most. I love soft edges on
tattoos, as well as showing how beautiful a bold line can be, combined
with smooth blending and negative space. In my world, anything goes as
long as I am given the freedom to do so by my clients. In this
particular tattoo, I will apply all of these elements including the
bold and fine lines, soft and hard edges, smooth blending and negative
space along with a realistic light source.
Procedure Set-Up
-Before I set up my machines, I closely check my needles for any
imperfections using an eye loupe. The smallest imperfections can
damage the skin and cause scabbing. I will be using four different
machines: two shaders and two rounds. My needle groupings of choice
are 13 bug pins which fit in a 9-mag tip, and 13 regular curved mags
which is the largest size I like to use. For liners, I will be using a
5-tight and 9-round. These options allow me to have a wide range
throughout the tattooing process. These sizes, I have found, work best
for me and the type of work I typically do. It is always important to
experiment with different needle groupings to find out what works best
for you as an individual.
-My color palette selection will vary greatly. I will have a lot of
cool tones, for the background and hair, and warm tones for the
foreground.
-I prepare the skin, prior to applying the stencil, by cleaning it
with the paper towel and green soap. This will create a lather, which
will make shaving the area much easier. In the preparatory process, it
is important to cause as little irritation to the skin as possible,
because it allows the client to sit longer and it makes the skin more
cooperative. For these reasons, I always shave in a downward motion,
which prevents the skin from flaring up. After shaving, I use
distilled water to clean away any green soap residue or loose hair
that may be left behind. I then apply rubbing alcohol or an unscented
hand sanitizer to ensure the skin is as clean as possible. You will be
surprised how much dirt will come out of the skin and, if its not
removed, it will just be pushed deeper into the skin during the
tattooing process. Once the tattoo area is cleaned, I always ensure my
client does not touch it. Just because it is their body, doesn't mean
their hands are sterile. I then apply the stencil with Dettol, which
works very well for me, as it stays great on the skin.
Tutorial Available in Tattoo Masters Magazine
Purchase yours today: http://www.tattoomaster.co.uk/
Introduction
-In the following tutorial, I am going to take you through my process
of developing and executing a tattoo. All aspects of sterilization and
cross contamination should be covered before beginning a tattoo. This
is in no way a replacement for an apprenticeship, or an instructional
on how to learn to tattoo; this is simply my way of tattooing. I will
be walking you through every step of my creative thought processes. In
this tutorial, I will be elaborating on how I execute the following
steps.
-Reference
-Drawing and Design
-Creating a Stencil
-Tattooing Style
-Procedure Set-up
-Tattoo Procedure
-Aftercare
Reference
-The piece I will be doing is a female zombie. I usually like to keep
my tattooing really fun and relaxed. I always try to draw everything
that I tattoo, even if it is created from a reference. I believe that
it keeps my drawing skills sharp, and continuously allows me to
improve. This particular reference is a photograph that I took of my
wife. I took various photos with different types of lighting. I
really wanted to have dramatic lighting on this piece, so we used
different elements, such as, a flashlight in a dimmed room to achieve
my desired effect. When you get a good picture, with excellent
lighting, there is not much that needs to be manipulated by Photoshop.
However, I took this picture and put it in Photoshop, and it flipped
horizontally “Flip Canvas”
I then used the “Apply Image” tool at a thirty-percent ratio, which gives an overall sharper contrast. Funny enough, I learned this helpful tool from Brandon Bond.
I finish it off with the “Burn Tool,” which helps create a higher contrast
on selected areas. The reference is now ready to be used to create the
design.
Drawing and Design
-As mentioned earlier, I like to draw as much as possible for my
tattoos, even when I have reference available. Unless I am doing a
portrait, I like to loosely use the picture to create a drawing of my
own. This is very helpful in creating accurate proportions and light
sources. In this reference in particular, I am solely using the pose,
proportions and light source, rather than creating a reproduction of
the photo. Especially since the reference photo is my wife, I would
not tattoo a portrait of her on anybody, and would prefer nobody else
do so. This makes the process a lot of fun for me. I am able to take a
photo, and create something completely different from it, while still
keeping the foundation of the reference.
-I like to start off with a color pencil sketch which allows me to
change shapes and add elements. I prefer color pencil over lead
because I am still able to see the colored lines, and with lead, it
tends to smear easier and becomes more difficult to see. When you have
a colored pencil sketch, you can make a photocopy in color and then
you can go over it with a dark pencil to clean the design up.
-When creating a background, I like to keep it as minimal as possible.
That allows me to have a more detailed foreground and I always keep in
mind that the client may possibly want to add to the piece in the
future; a busy background makes that harder to do. I never want to
create a tattoo where the main piece is overpowered by the background.
-In this drawing, I used the face, instead of the entire upper body,
so I could use the space more efficiently and put a great amount of
detail, as opposed to doing the same amount of detail on a small face;
this will help the tattoo last for a long time. The size of the moon
creates balance within the image, and the flowing hair is a good segue
into another piece, if desired by the client.
Creating a Stencil
-When making a stencil, there are a few different things that I may
do. If I am working on a portrait, I make a copy of the photo and
trace the copy on top of the thermal fax paper. This helps me achieve
accuracy in a portrait, without having a barrier, such as tracing
paper, in between the photo and myself. When doing something more
stylized, such as this tattoo, I simply trace my line drawing while
keeping it loose. I let the shading and coloring happen once I being
to work directly on the skin. Another possibility is free-handing a
design directly on the skin. I use different colored sharpies,
starting with a light sharpie, to map out the overall area to be
worked on. I then use a medium colored sharpie to create a sketch, and
finally, finish with a dark sharpie to refine details before beginning
to tattoo.
Tattooing Style
-Now that the stencil, or drawing, is applied to the skin, you can go
in a number of directions. In my time tattooing, I have experimented
with, and applied various elements that have created my personal
style, which is constantly evolving. Some of the styles I have enjoyed
doing most are realism, neo-traditional, and illustrative. I have
taken all of these styles and fused them into one undefined style;
currently, this is what I enjoy doing most. I love soft edges on
tattoos, as well as showing how beautiful a bold line can be, combined
with smooth blending and negative space. In my world, anything goes as
long as I am given the freedom to do so by my clients. In this
particular tattoo, I will apply all of these elements including the
bold and fine lines, soft and hard edges, smooth blending and negative
space along with a realistic light source.
Procedure Set-Up
-Before I set up my machines, I closely check my needles for any
imperfections using an eye loupe. The smallest imperfections can
damage the skin and cause scabbing. I will be using four different
machines: two shaders and two rounds. My needle groupings of choice
are 13 bug pins which fit in a 9-mag tip, and 13 regular curved mags
which is the largest size I like to use. For liners, I will be using a
5-tight and 9-round. These options allow me to have a wide range
throughout the tattooing process. These sizes, I have found, work best
for me and the type of work I typically do. It is always important to
experiment with different needle groupings to find out what works best
for you as an individual.
-My color palette selection will vary greatly. I will have a lot of
cool tones, for the background and hair, and warm tones for the
foreground.
-I prepare the skin, prior to applying the stencil, by cleaning it
with the paper towel and green soap. This will create a lather, which
will make shaving the area much easier. In the preparatory process, it
is important to cause as little irritation to the skin as possible,
because it allows the client to sit longer and it makes the skin more
cooperative. For these reasons, I always shave in a downward motion,
which prevents the skin from flaring up. After shaving, I use
distilled water to clean away any green soap residue or loose hair
that may be left behind. I then apply rubbing alcohol or an unscented
hand sanitizer to ensure the skin is as clean as possible. You will be
surprised how much dirt will come out of the skin and, if its not
removed, it will just be pushed deeper into the skin during the
tattooing process. Once the tattoo area is cleaned, I always ensure my
client does not touch it. Just because it is their body, doesn't mean
their hands are sterile. I then apply the stencil with Dettol, which
works very well for me, as it stays great on the skin.
Tattoo Procedure
-Outline
-I am going to go through and outline the entire thing; paying
attention to the areas where I want my thick and thin lines. For the
frame of the piece, I used a combination of thick and thin lines. This
will create a great dynamic in the hair which is what I would like to
achieve. In the key elements of the face, such as the eyes, lips and
nose, I will use black lines in combination with a lighter value in
order to create softer yet sharp edges. I will map out the background
with a blood line to hold the reference without creating a hard line.
-Color
-Since this is a larger piece, I will complete the color in sections.
This will make it easier on my client, allowing him to sit longer. I
will not use grey wash, instead, I will use black blended out to color
tones. While blending, I always dip from the next color without
rinsing; this keeps the elements of the last color I used, which will
result in a seamless color transition. I will start off with the hair
and then work my way to the face, which has the brightest tones. When
I work on the brighter tones, I will make sure my tubes are free of
any undesired colors by rinsing really well. In this case, rinsing will prevent my colors from being muddied. For this tattoo, I want to keep a clean and pretty look
to it with a twist of gore. I want to have a bloody element to this
piece, without over doing it. To create the blood, I will start off
with really dark tones, such as dark purple, to a bright red to create
depth and the illusion of blood. It will be important to leave tiny
edges open to add highlights, which will appear brighter if they are
surrounded by contrasting color.
Aftercare
-We all know the standard aftercare procedures and the various ways to
heal a tattoo. Through experimentation, I have found that the two day
wrap method followed by dry healing works best. I follow this for the
healing of tattoos on myself and advise my clients to do so as well.
After the tattoo is complete, I clean it really well, freeing it of
ink, blood, and all other bodily fluids. I wrap the tattoo, using no
ointment or any other substance, with saran wrap. This allows the
pores to open up and naturally secrete plasma, which I find relieves
the swelling of the tattooed area. I advise leaving it on for four
hours, and then washing the tattoo thoroughly with antibacterial soap,
and patting it dry with a paper towel. Then, let it breathe for 10-15
minutes before wrapping it again. I suggest washing and re-wrapping
around three times a day. This should be repeated the following day
and night before allowing the tattoo to dry out. Once the tattoo has
dried out, it is still important to wash it routinely. Once it begins
to peel, you can begin applying fragrance-free lotion as needed.

Credits
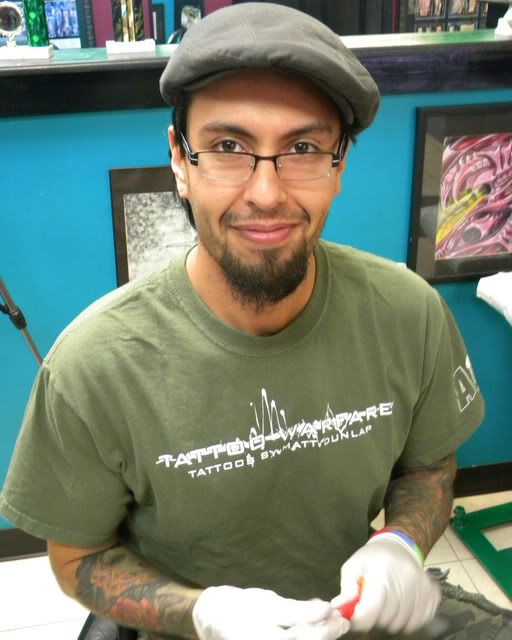
Tattoo and Artwork by Vince Villalvazo
All or Nothing Tattoo Studio Atlanta, GA
Client is Christopher Gleeson (Chicago, Illinois)
Written by Tara Villalvazo
Photos by: Pablo, Frankie, Corey, Jarvis, Matt and Tara
No comments:
Post a Comment